서비스를 개발하다보면 프론트엔드와 백엔드에서 공통적으로 읽고 써야 하는 데이터 구조가 생기곤합니다. 개발 시 데이터의 타입을 확정짓기 위해서 데이터를 쓰기 전에 그 데이터가 올바른 구조를 만족하는지 확인해야 하는데요, 이럴 때 JSON Schema를 자주 사용합니다.
JSON Schema
공식문서에서는 JSON Schema를 JSON 문서의 구조, 제약 조건, 데이터 타입을 주석으로 달고 검증하기 위한 선언형 언어로, 이를 통해 JSON 데이터에 대한 기대치를 표준화하고 정의할 수 있는 방법을 제공한다고 설명합니다.
JSON Schema 사용 예시
JSON Schema를 사용해서 유저에 대한 데이터와 결제에 관한 데이터를 검증하는 예시입니다.
사용된 코드를 이해할 수 있도록 간단히 구조를 살펴보면
type: 데이터의 유형을 정의object,array,string,number,integer,boolean,null등의 타입을 사용할 수 있습니다.properties: 객체 내부의 속성들을 정의required: 객체 항목 중 필수인 항목을 지정minimum: 숫자의 값에 최소값을 설정
{
  "$schema": "http://json-schema.org/draft-07/schema#",
  "type": "object",
  "properties": {
    "user": {
      "type": "object",
      "properties": {
        "id": {
          "type": "string",
          "format": "uuid"
        },
        "name": {
          "type": "string",
          "minLength": 1
        },
        "email": {
          "type": "string",
          "format": "email"
        }
      },
      "required": ["id", "name", "email"]
    },
    "payment": {
      "type": "object",
      "properties": {
        "method": {
          "type": "string",
          "enum": ["credit_card", "paypal", "bank_transfer"]
        },
        "transactionId": { "type": "string" },
        "amount": {
          "type": "number",
          "minimum": 0
        }
      },
      "required": ["method", "transactionId", "amount"]
    }
  },
  "required": ["user", "payment"]
}
데이터의 타입과 필드를 필수로 설정하거나, 값이 N보다 커야하는 등 JSON 데이터를 검증할 수 있습니다.
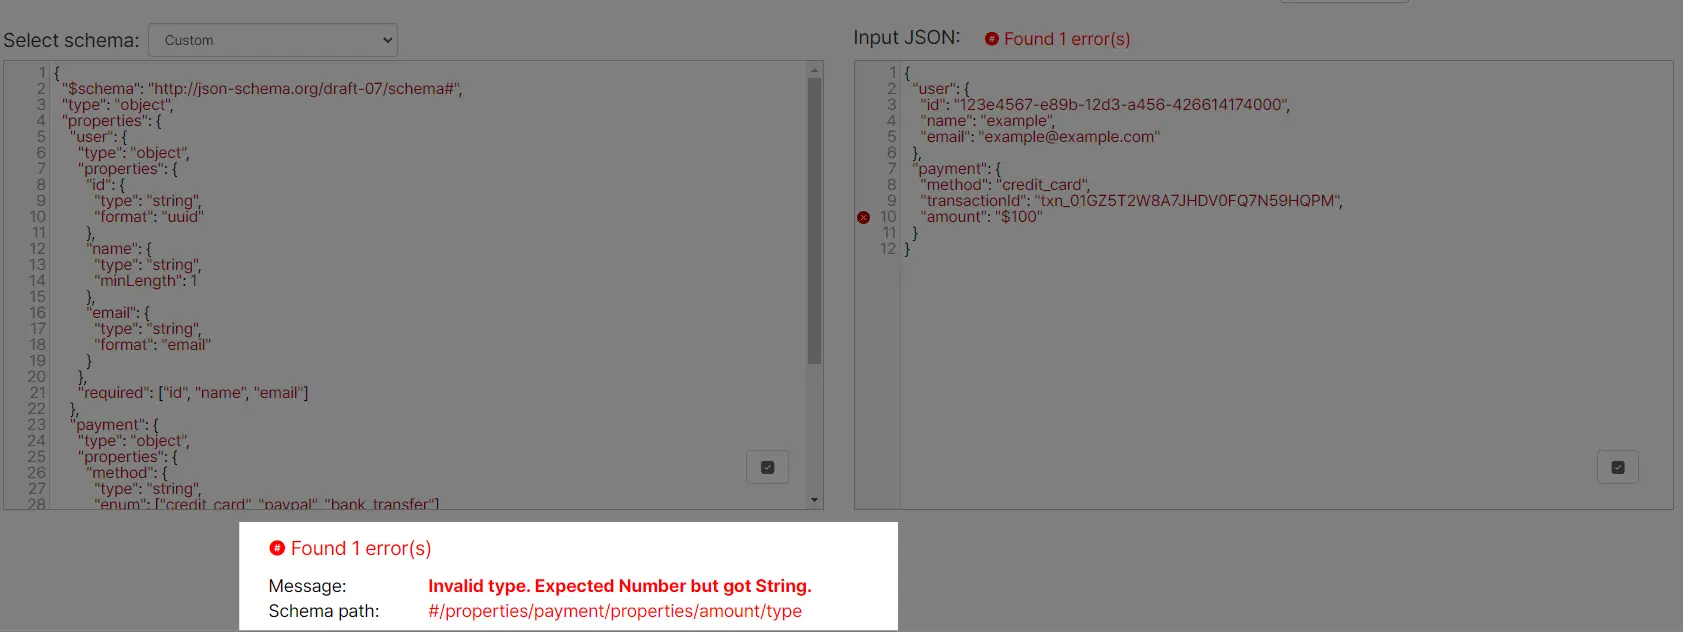
위 예시에서는 결제 데이터 중 amount 값의 타입을 숫자로 지정해두었는데요, JSON Schema 검증 도구에 amount를 숫자가 아닌 문자 ($100)을 넣으면 숫자가 아닌 문자가 들어왔다고 검증에 실패하게 됩니다.
이는 특정 언어에 종속받지 않는 규격이기 때문에, 백엔드와 프론트엔드에서 사용하는 언어가 다르더라도 사용 가능합니다. 자바는 networknt/json-schema-validator, 파이썬에서는 jsonschema, 타입스크립트에서는 ajv 등의 라이브러리가 있습니다.
Zod
하지만 개인적으로는 협업할 때 다소 아쉬움이 느꼈는데요.
타입스크립트에서 사용하는 런타임 데이터 검증 라이브러리인 zod를 사용하면,
- 데이터 검증 시 타입을 추론해주는 기능도 있어 데이터의 타입을 따로 작성하지 않아도 되고
- json schema보다 가독성도 좋고 작성하기 간편합니다.
z.object({
  user: z.object({
    id: z.string().uuid(),
    name: z.string().min(1),
    email: z.string().email(),
  }),
  payment: z.object({
    method: z.enum(["credit_card", "paypal", "bank_transfer"]),
    transactionId: z.string(),
    amount: z.number().min(0),
  }),
});
차라리 데이터 구조를 zod로 작성하고 타입스크립트에서는 그대로 zod를, 다른 언어에서는 zod로 json schema를 추출해서 검증하는게 개발자 경험이 더 좋을 것 같았습니다. 아래 라이브러리로 zod로 json schema를 추출할 수 있습니다.
github Action을 사용한 시스템 구성하기
스키마 작성 -> github actions -> 프로젝트 개발 시 동작은 아래와 같습니다.

Github Action은 아래 코드처럼 데이터 검증 (jest 테스트) -> Json Schema 파일 생성 -> 깃에 푸시하는 단계로 구성했습니다.
name: JSON Schema Generation and Validation

on:
  push:
    branches:
      - main

jobs:
  build:
    name: JSON Schema Generator
    runs-on: ubuntu-latest

    steps:
      # 1. Check out the repository
      - uses: actions/checkout@v2

      # 2. Install dependencies using Yarn
      - uses: borales/actions-yarn@v4
        with:
          cmd: install

      # 3. Run tests
      - uses: borales/actions-yarn@v4
        with:
          cmd: test

      # 4. Run the 'yarn generate' command to generate files
      - uses: borales/actions-yarn@v4
        with:
          cmd: generate

      # 5. Check for changes, commit, and push
      - name: Commit and Push changes if any
        env:
          GITHUB_TOKEN: ${{ secrets.GITHUB_TOKEN }}
        run: |
          git config --global user.name "github-actions[bot]"
          git config --global user.email "github-actions[bot]@users.noreply.github.com"
          git add .

          # Check if there are any changes to commit
          if git diff --staged --quiet; then
            echo "No changes to commit."
          else
            git commit -m "Generated files via GitHub Actions"

            # Pull the latest changes from the remote before pushing
            git pull --rebase origin main

            # Push the changes to the main branch
            git push origin HEAD:main
          fi
스키마를 더욱 이해하기 쉽게 예시 데이터를 넣을 수도 있고, 기존 데이터가 스키마와 충돌되지는 않는지 테스트 할 수 있도록 만들었습니다.
schema 안에 각 스키마별로 index.ts에 zod 스키마를 작성하고, 하위 examples 폴더에 예시 json을 넣습니다.
│  generate-schemas.ts
│  jest.config.js
│  validation.test.ts
│
├─.github
│  └─workflows
│          main.yml
│
└─schema
    └─user
        │  index.ts
        │  readme.md
        │
        └─examples
                user-pay.json
user-only.jsonvalidation.test.ts는 ts-jest를 이용해서 작성했고, 스키마별로 index.ts 파일을 읽어서 examples 폴더의 json 파일들을 검증합니다.
import * as fs from "fs";
import path from "path";
const schemaFolders = fs.readdirSync("./schema");
schemaFolders.forEach((schemaFolder) => {
describe(`${schemaFolder} 스키마 테스트`, () => {
const schemaFolderPath = path.join(__dirname, "schema", schemaFolder);
const examplesFolderPath = path.join(schemaFolderPath, "examples");
const schemaFilePath = path.join(schemaFolderPath, "index.ts");
it.each(fs.readdirSync(examplesFolderPath))(
`${schemaFolder}/%s validation`,
async (fileName) => {
const validator = (await import(schemaFilePath)).default;
const raw = fs.readFileSync(
path.join(examplesFolderPath, fileName),
"utf-8"
);
const json = JSON.parse(raw);
const parseResult = validator.safeParse(json);
if (parseResult.success === false) {
console.error(parseResult.error);
}
expect(parseResult.success).toEqual(true);
}
);
});
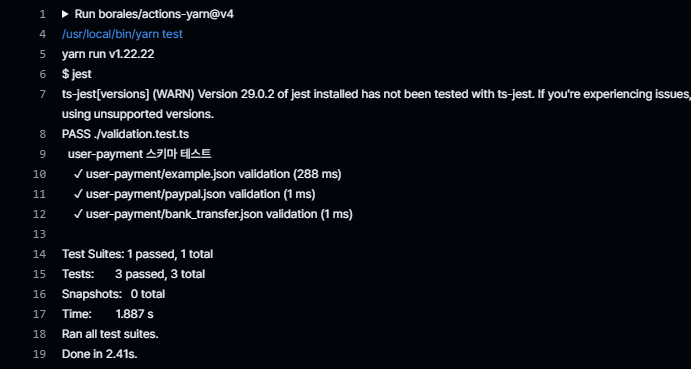
});github actions에서는 아래처럼 테스트 결과를 보실 수 있습니다.
zod를 json schema로 바꿔주는 generate-schemas.ts는 테스트 코드처럼 각 폴더의 index.ts 에 default 로 export 된 zod 스키마를 가져온 후, zod-to-json-schema 라이브러리로 json schema 를 추출한 후 파일로 저장합니다.
import fs from "fs/promises";
import path from "path";
import { zodToJsonSchema } from "zod-to-json-schema";

const jsonSchemaFolderPath = path.join(__dirname, "jsonSchema");

(async () => {
  // jsonSchema 폴더가 없으면 생성
  try {
    await fs.mkdir(jsonSchemaFolderPath, { recursive: true });
  } catch (error) {
    console.error(`Error creating directory ${jsonSchemaFolderPath}:`, error);
    process.exit(1); // 오류 발생 시 종료
  }

  // 기존 파일 삭제
  try {
    const files = await fs.readdir(jsonSchemaFolderPath);
    for (const file of files) {
      const filePath = path.join(jsonSchemaFolderPath, file);
      await fs.unlink(filePath);
    }
  } catch (error) {
    console.error(
      `Error reading or deleting files in ${jsonSchemaFolderPath}:`,
      error
    );
  }

  // 스키마 폴더 읽기
  try {
    const schemaFolders = await fs.readdir("./schema");

    // json 스키마 파일 생성
    await Promise.all(
      schemaFolders.map(async (schemaFolder) => {
        const schemaFolderPath = path.join(__dirname, "schema", schemaFolder);
        const schemaFilePath = path.join(schemaFolderPath, "index.ts");

        const validator = (await import(schemaFilePath)).default;

        const jsonSchemaFilePath = path.join(
          jsonSchemaFolderPath,
          `${schemaFolder}.json`
        );

        await fs.writeFile(
          jsonSchemaFilePath,
          JSON.stringify(zodToJsonSchema(validator), null, 4)
        );
      })
    );
  } catch (error) {
    console.error("Error generating schemas:", error);
    process.exit(1); // 오류 발생 시 종료
  }
})();
이제 메인 브랜치를 업데이트하면 github action으로 자동으로 예시 데이터를 검증하고, jsonSchema 폴더에 json schema 파일을 저장합니다.
깃을 사용해 자연스럽게 형상 관리도 할 수 있고, 타입스크립트를 사용하는 프로젝트에서는 npm으로 .ts 파일만 배포해서 패키징을 해 zod의 이점을 살려서 개발할 수 있습니다.
만약 타입스크립트가 아닌 언어를 사용중이라면, 스키마를 직접 다운받거나, git 서브모듈 등의 방법으로 스키마를 참조할 수 있습니다.